Chapter 04 of 18
Chapter 4: Your First LLM-Powered Workflow
Move from prompting in a chat window to building a repeatable, automated LLM workflow you can run with a single command — a Requirements Analyzer that evaluates each requirement and produces a structured report.
Part 1 — Foundations
Chapter 4: Your First LLM-Powered Workflow
Theory without practice is empty. In this chapter, you will move from prompting in a chat window to building a repeatable, automated LLM workflow you can run with a single command. By the end, you will have a working Requirements Analyzer that reads a requirements document, evaluates each requirement for quality, and produces a structured report — your first real tool as an LLM-augmented analyst.
Reading time: ~20 min Project: Requirements Analyzer
4.1 Setting Up Your Environment
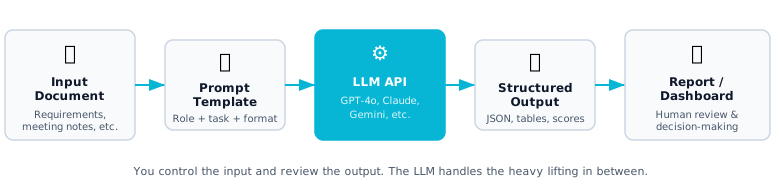
Your First LLM Workflow — a repeatable pipeline where your document is combined with a prompt template, sent to an LLM API, and returned as structured output for human review. The analyst's judgment remains central at both ends.
Before writing your first line of code, you need a clean development environment. Even if you are not a developer by trade, the setup is straightforward and will save hours of frustration later.
What You Need:
- Python 3.10 or later — The dominant language for AI/ML work with the best library ecosystem for LLM integration.
- A code editor — VS Code is the recommended choice. Free, widely supported, excellent Python and Jupyter notebook support.
- An LLM API account — At least one: OpenAI (GPT models), Anthropic (Claude), or Google (Gemini). OpenAI is the primary example in this chapter, with Anthropic alternatives shown.
Step-by-step setup: (1) Install Python 3.10+ and VS Code. (2) Create a project folder and install the LLM libraries: pip install openai anthropic python-dotenv. (3) Create a .env file to store your API keys securely — never commit this to git. (4) Organize your project with folders for prompts, input data, output reports, and source code. If you need help, your team's developer can walk you through the one-time setup in about 15 minutes.
Security first: API keys are like passwords. Anyone with your key can make API calls billed to your account. Never put keys directly in your code. Never commit .env files to git. Never share keys in emails, Slack, or documentation. Use environment variables or a secrets manager in production.
4.2 API Keys and Authentication
LLM providers use API keys for authentication and billing.
Getting Your API Keys:
| Provider | Sign-Up URL | Free Tier | Typical Cost for Learning |
|---|---|---|---|
| OpenAI | platform.openai.com | $5 free credit for new accounts | $5-20/month |
| Anthropic | console.anthropic.com | $5 free credit for new accounts | $5-20/month |
| aistudio.google.com | Generous free tier | Often free for learning |
Secure Key Management: Store API keys in a .env file in your project folder (e.g., OPENAI_API_KEY=sk-your-key-here). Your Python code reads this file automatically using the python-dotenv library. Most LLM libraries detect API keys from environment variables automatically, so the setup is straightforward.
Cost controls: Set spending limits before you start making API calls.
- OpenAI: Settings > Billing > Usage limits
- Anthropic: Console > Settings > Spending
- In your code: Track token usage and set per-session budgets
Every API response includes token usage data. At roughly $0.15 per million tokens for GPT-4o-mini, a typical requirements analysis session (20 requirements) costs well under $0.05. Both OpenAI and Anthropic provide usage dashboards where you can set monthly spending limits and monitor costs without writing any code.
For learning and experimentation, $5-10 per month is more than sufficient. Use GPT-4o-mini or Claude Haiku for iterative prompt development (fractions of a cent per call), then switch to GPT-4o or Claude Sonnet for final production-quality runs.
4.3 Making Your First API Call
With your environment set up and API keys secured, here is your first programmatic LLM call — starting simple, then building complexity.
"""
Your first LLM API call — analyzing a requirement.
"""
from openai import OpenAI
from dotenv import load_dotenv

load_dotenv()
client = OpenAI()  # Automatically uses OPENAI_API_KEY from environment

# A simple requirement to analyze
requirement = """
The system shall allow users to reset their password by clicking
a "Forgot Password" link on the login page.
"""

# Make the API call
response = client.chat.completions.create(
    model="gpt-4o-mini",           # Cost-effective for learning
    temperature=0.2,                # Low temperature for analytical tasks
    messages=[
        {
            "role": "system",
            "content": "You are a Senior Business Analyst. Analyze requirements "
                       "for completeness, ambiguity, and testability. Be specific "
                       "and constructive in your feedback."
        },
        {
            "role": "user",
            "content": f"Analyze this requirement:\n\n{requirement}"
        }
    ]
)

# Extract the response
analysis = response.choices[0].message.content
print("Analysis:")
print(analysis)

# Check usage
print(f"\nTokens used: {response.usage.prompt_tokens} input, "
      f"{response.usage.completion_tokens} output")
print(f"Total: {response.usage.total_tokens} tokens")
The Anthropic (Claude) API is very similar. The main differences: the system message is a separate parameter rather than part of the messages array, max_tokens is required, and the response is accessed via response.content[0].text instead of response.choices[0].message.content.
| Feature | OpenAI | Anthropic |
|---|---|---|
| System message | Included in messages array with role "system" | Separate system parameter |
| Max tokens | Optional (model has defaults) | Required — must specify max_tokens |
| Response access | response.choices[0].message.content | response.content[0].text |
| Token tracking | response.usage.prompt_tokens | response.usage.input_tokens |
| JSON mode | response_format={"type": "json_object"} | Use prompt instructions (or tool_use for structured output) |
In production workflows, consider using a library like litellm that provides a unified interface across multiple LLM providers. This lets you switch models without changing your code — useful for cost optimization, testing, and fallback strategies.
4.4 Building a Simple Analyzer
Here is something genuinely useful: a tool that reads a list of requirements and produces a quality assessment for each one.
The approach: create a system prompt that instructs the LLM to act as a Senior BA and analyze each requirement on five dimensions (clarity, completeness, testability, consistency, feasibility), returning a JSON object with scores, issues found, and an improved version. Then loop through your requirements file, sending each requirement to the API and collecting the results.
The core of the analyzer — the part that sends a single requirement for analysis:
# Analyze a single requirement and get structured results
import json
from openai import OpenAI

client = OpenAI()

response = client.chat.completions.create(
    model="gpt-4o-mini",
    temperature=0,
    response_format={"type": "json_object"},  # Guarantees valid JSON
    messages=[
        {"role": "system", "content": ANALYSIS_PROMPT},  # Your detailed prompt
        {"role": "user", "content": requirement_text}
    ]
)

result = json.loads(response.choices[0].message.content)
print(f"Score: {result['overall_score']}/5 — {result['verdict']}")
For a batch of requirements, wrap this in a loop that reads from a text file (one requirement per paragraph) and collects all results into a report. A typical run analyzing 20 requirements takes about 30 seconds and costs under $0.05 with GPT-4o-mini.
Your first version will not be perfect. Run it on 10-20 real requirements from your project, review the outputs carefully, and adjust the prompt based on where the model's assessments differ from your expert judgment. This iterative refinement is normal. It is how prompt engineering works.
4.5 Handling Responses and Errors
Production-quality workflows need robust error handling. LLM API calls can fail for many reasons: network issues, rate limits, invalid inputs, or unexpected response formats.
For production-quality workflows, wrap your API calls in a retry function that handles rate limits (wait and retry with exponential backoff), connection errors (retry after a brief pause), and JSON parse failures (retry once, then return the raw text). The OpenAI library raises specific exceptions — RateLimitError, APIConnectionError, and APIError — that you can catch and handle individually. Three retries with a 2-second initial delay handles the vast majority of transient failures automatically.
Common Error Patterns and Solutions:
| Error | Cause | Solution |
|---|---|---|
RateLimitError | Too many requests per minute | Implement exponential backoff; add delays between batch calls |
InvalidRequestError (context length) | Input exceeds model's context window | Truncate or chunk the input; use a model with a larger context window |
AuthenticationError | Invalid or expired API key | Verify the key in your .env file; regenerate if needed |
| JSON parse failure | Model returned text instead of valid JSON | Use JSON mode; add "Return ONLY valid JSON" to the prompt; retry |
| Empty or truncated response | max_tokens too low | Increase max_tokens; check finish_reason for "length" |
Always check response.choices[0].finish_reason. If it is "length" instead of "stop", the model's response was cut off at the max_tokens limit — your output is incomplete. Increase max_tokens or ask for a more concise response.
4.6 From Script to Reusable Tool
A script that runs once is useful. A tool that your whole team can use, handles edge cases gracefully, and produces consistent output is transformative. Refactor the requirements analyzer into a proper reusable tool.
Package it as a command-line tool that accepts an input file and produces a JSON report. The tool should: (1) read requirements from a text file (one per paragraph), (2) send each to the LLM with the analysis prompt, (3) collect all results, (4) compute summary statistics (pass rate, average scores, most common issues), and (5) save the report to a JSON file. Usage: python requirements_analyzer.py input.txt --output report.json. You can convert the JSON into a formatted HTML report or import it into a spreadsheet for team review.
Once your tool works reliably, share it with your team. Create a simple README with usage examples, expected input format, and sample output. Most analysts do not need to understand the code — they need to know how to run it and interpret the results.
4.7 Measuring Quality and Cost
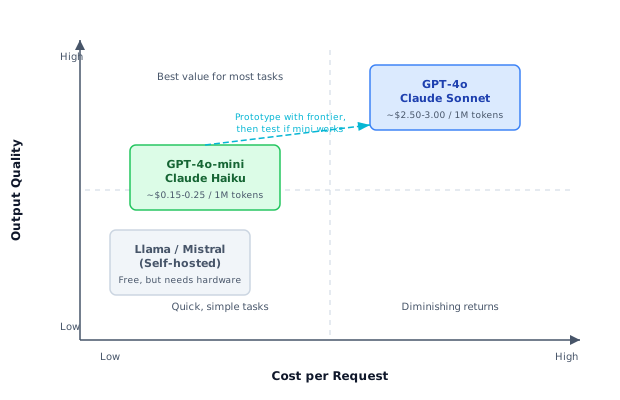
Cost vs Quality Trade-off — efficient models (GPT-4o-mini, Claude Haiku) handle most analyst tasks well at a fraction of the cost. Use frontier models (GPT-4o, Claude Sonnet) for complex analysis where quality justifies the expense. Smart strategy: prototype with the best model, then test whether a cheaper one produces acceptable results.
Quality Metrics for Analyst Workflows:
| Metric | What It Measures | How to Calculate | Target |
|---|---|---|---|
| Acceptance Rate | % of LLM output used without modification | Count of accepted items / total items generated | >60% for first drafts |
| Edit Distance | How much the analyst changes the LLM output | Character/word changes between LLM output and final version | <30% modification |
| Time Savings | Actual hours saved vs. manual approach | Time(manual) - Time(LLM-assisted) for equivalent quality output | >50% reduction |
| Defect Detection Rate | Issues found by LLM that humans missed (and vice versa) | Compare LLM findings with manual review findings | LLM catches 80%+ of human-found issues |
| False Positive Rate | Issues flagged by LLM that are not actually issues | Count of false positives / total issues flagged | <20% |
Track these metrics in a simple spreadsheet after each workflow run: items generated, items accepted as-is, items modified, items rejected, time elapsed versus estimated manual time, and API cost. For a typical sprint of 15 requirements, an analyst might save 4-5 hours of review time at a cost of $0.12 in API calls — a return of more than 2,000x on the direct cost.
As you track metrics over time, you will notice your acceptance rate increases and edit distance decreases as you refine your prompts based on what you learn. Each workflow iteration makes the next one better. Building measurement into your workflows from the start creates a feedback loop that continuously improves your LLM integration.
Project: Requirements Analyzer
Your capstone project for Part 1 brings together everything you have learned. Build a complete Requirements Analyzer you can use on real projects.
Requirements:
- Reads requirements from a text file (one requirement per paragraph)
- Analyzes each requirement for clarity, completeness, testability, consistency, and feasibility
- Produces both a JSON report and a human-readable summary
- Includes cost tracking and quality metrics
- Handles errors gracefully with retry logic
Extension Challenges:
- Cross-reference check: After individual analysis, run a second pass that checks for inconsistencies between requirements (conflicting constraints, overlapping scope, missing dependencies)
- HTML report: Generate an HTML report with color-coded quality scores (green/yellow/red) shareable with stakeholders
- Multi-model comparison: Run the same requirements through two different models and compare their assessments to identify where models disagree (these disagreements often highlight genuinely ambiguous requirements)
- Historical tracking: Store results over time so you can track whether your team's requirements quality is improving across sprints
HTML Report Extension: Build a simple HTML page that loops through each requirement, displays its score with color coding (green for 4-5, yellow for 3, red for 1-2), and shows the verdict and issue count in a table. This produces a shareable report that stakeholders can review in any browser. Ask a developer on your team for help building this, or use an LLM to generate the HTML template from your JSON schema.
Exercises
Conceptual. Your manager asks: "How do I know the LLM is not making up problems that do not exist in our requirements?" Design a validation protocol that would give them confidence in the tool's assessments. Consider calibration approaches, spot-checking strategies, and metrics that demonstrate reliability.
Coding. Extend the RequirementsAnalyzer to support a --compare flag that runs each requirement through two different models (e.g., GPT-4o-mini and Claude Haiku) and highlights disagreements. Requirements where the two models disagree on the verdict should be flagged for human review. Include a "confidence" score based on inter-model agreement.
Design. Design a dashboard mockup (wireframe or description) for a "Requirements Health Monitor" that your team would use at the start of each sprint. The dashboard should show: overall requirements quality trends across sprints, most common issue types, comparison of quality scores by BA author, and estimated time savings from LLM-assisted review. What data would you need to collect, and how would you integrate this with your existing project management tools?